
Hello everyone, in this project, I will be going over how to create a web server using CentOS, a widely used open-source Linux distribution.
I will be using an AWS CentOS Instance and installing Apache Web server, an open-source software for hosting websites and web applications.
I will then pass in some HTML code for a landing page that can be accessed using the public IP of the server.
Some advantages of using Apache include:
- Flexibility to run on various operating systems
- Ability to support various programming languages
- Highly customizable to allow the addition or removal of features
- Wide range of security features to help protect websites and web applications
The pre-requisites to complete this project are:
- An AWS Account
- An IAM user with administrator privileges (optional, but recommended)
Let’s get into it.
Steps
- Login to your AWS account and navigate to the EC2 console
- Launch an instance with the following configurations
- Name the instance e.g. web-server
- Click on Browse more AMIs, select the AWS MarketPlaceAMIs tab and search for CentOS

- Select a CentOS AMI
- Instance type: t2.micro (Free tier eligible) → We’re selecting this to minimize cost
- Create a key pair if you do not have one. If you do not have one, name the key pair, select RSA for key pair type and .pem for Private key file format.
Note: A key pair will be saved to your computer. Make sure you know the location as you will need that later to SSH into your instance. In my case, I left the key pair in my Downloads folder.

- Create a security group that allows SSH traffic from anywhere, HTTPS traffic from the internet and HTTP traffic from the internet.
Note: This will allow the content of our instance to be accessed from anywhere on the internet.
- Launch the instance.
Note: If this is the first time you’re using a CentOS instance, it might take a few minutes for the instance to be in a “Running” state.

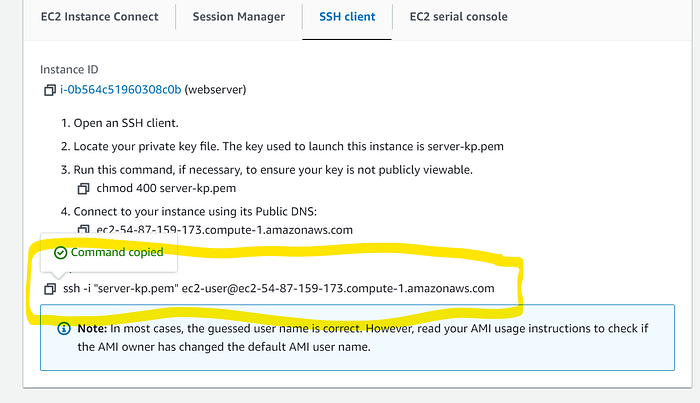
3. Once the instance is running, select it and click on Connect
- Click on SSH client and copy the command to SSH into your instance
- Open your terminal. I am using a Windows machine and searched/opened “Windows Powershell”
- Once the terminal is open, change the directory to the location of your key pair file. For me, this is the Downloads folder. The command I will run in the terminal to do this is:
cd Downloads- Paste the copied SSH command from earlier and hit the Enter Key
- At this point, we run into an error as permission is denied.

Note: After looking into this error by reading documentation, I discovered that the default cloud user for the CentOS AMI selected is “centos” and not “ec2-user”. Hence the command to SSH into the instance needs to be modified to reflect that. In my case, it changed from the command in line 1 to the command in line 2 below
Line 1: ssh -i "server-kp.pem" ec2-user@ec2-54-87-159-173.compute-1.amazonaws.com

Line 2: ssh -i "server-kp.pem" centos@ec2-54-87-159-173.compute-1.amazonaws.com- Once the command is changed to the right default user, SSH into the instance is granted.
4. Finally, we will now install the Apache webserver. To do this we will run the following commands one after the other
Line 1: sudo yum update
Line 2: sudo yum install httpd
Line 3: sudo systemctl start httpd
Line 4: sudo systemctl status httpd- Line 1 command updates all packages on the server
- Line 2 command installs the Apache web server
- Line 3 command starts the Apache web server
- Line 4 command checks the status of the Apache web server
Note: “sudo” is a command that lets you run commands with root user privileges. You will receive a prompt when running these commands asking if “Is this ok [y/d/N]:” You only need to type in ‘y’ and hit enter. These commands will take a few minutes to complete.
- The last step in this project will be to write a simple HTML file that will have the code for the landing page of the website accessible through the public IP of the instance.
- The file will need to be written on the HTML folder which is located in /var/www/html. I changed directories to this folder and attempted to make that file. However, when I tried to use the command “nano” which is a command to make files, I got an error stating “nano: command not found”
- To fix this, I ran another command to install the “nano” package. I learnt about the -y option and used it here to avoid having to type in y as a response to the install command
sudo yum install -y nano- Once this was done, I changed directories to the right location by running the following command
cd /var/www/html- I attempted to write the file here but realized I didn’t have the right permissions. A simple fix to this was to use the root user privileges by using the sudo command. See code below
sudo nano index.html- The code block I used for my website is shown below. You can change the text in between <h1> and </h1> to say whatever you desire
<html>
<head>
<style>
body {
background-color: #33342D;
}
h1 { color: white; }
h1 {
text-align:center
}
</style>
</head>
<body>
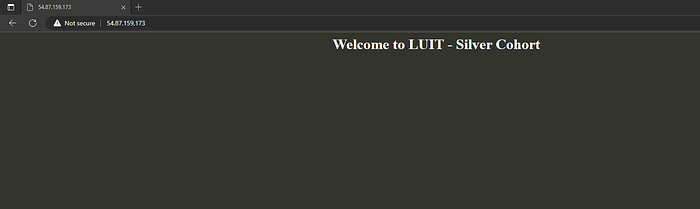
<h1>Welcome to LUIT - Silver Cohort</h1>
</body>
</html>- Once I saved this, I copied the public IP of my instance in the EC2 console and pasted it in a browser. It was successful as I saw the following
And that is it for this project.
Clean-Up
- To clean-up, you only need to navigate to the EC2 console and terminate the instance.
Hope you’ve enjoyed reading/working on this project thus far, please let me know if you have any questions.
Thank you and Happy learning!
